Ingredients
- 2½ cups all-purpose flour
- 2 tablespoons granulated sugar
- 1 teaspoon kosher salt
- 18 tablespoons chilled unsalted butter, cut into small cubes
- 6 to 8 tablespoons ice water
- Milk for brushing over crust
- 1½ pounds (about 3 large) firm-tart apples, peeled, cored, and cut into
- ½-inch-thick wedges
- 1½ pounds (about 3 large) firm-sweet apples, peeled, cored, and cut into
- ½-inch-thick wedges
- ¼ cup granulated sugar
- 2 tablespoons firmly packed light brown sugar
- 1 tablespoon lemon juice
- 1½ tablespoons cornstarch
- ¼ teaspoon ground cinnamon
- ¼ teaspoon freshly ground nutmeg
- ¼ teaspoon kosher salt
Preparation
For the crust: In a medium bowl, whisk together the flour, sugar, and salt until well combined. Sprinkle the butter over the flour mixture and use your fingers to work it in (rub your thumb against your fingertips, smearing the butter as you do). Stop when the mixture looks like cornmeal with some pea-sized bits of butter remaining. Sprinkle 6 tablespoons ice water on top and stir with a fork until the dough begins to come together. If needed, add more ice water, a tablespoon at a time. Turn out onto a lightly floured surface and knead three times, or just enough to make a cohesive dough—do not overmix! Gather into a ball, then divide into two pieces, one slightly larger than the other. Press each piece into a disk and wrap in plastic wrap. Refrigerate for 50 minutes and up to 2 days.
Prepare the filling: In a large bowl, toss the apples with the sugar, brown sugar, lemon juice, cornstarch, cinnamon, nutmeg and salt. Set aside.
Preheat the oven to 425°F and set a rack to the lowest position. Prepare the crust: Dust your counter and rolling pin with flour. Unwrap the larger disk of dough and put it on the counter; flip over to coat with flour. Working from the center, roll the dough out to a 13-inch circle ¹/8 inch thick. As you roll, turn the dough periodically and flip it over to prevent sticking; dust with additional flour as needed. Roll the dough up around the rolling pin and transfer to a pie plate. Press the dough into the sides of the plate, draping any excess over the edge. Fill the crust with the apple mixture, making the pile a bit higher in the center. Set aside (if it’s a warm day, transfer to refrigerator to chill while you roll out the top crust).
Unwrap the smaller disk of dough and roll out as before to a 10-inch circle about 1/8 inch thick. Transfer the dough to the pie and lay it over the filling. Using a sharp knife, make three 3-inch slashes in the top crust to allow steam to escape. Fold the top crust over the bottom crust and crimp to seal. Brush the crust all over with milk.
Put the pie on a baking sheet and bake on the lowest rack for 10 minutes. Reduce the heat to 350°F and bake until juices are bubbling and the crust is golden brown, another 45 to 55 minutes. Let cool on a rack for at least 45 minutes before serving.
Apple Notes: Pies require firm apples. A mix of sweet and tart fruit is best to give the pie the richest flavor. Some of my favorite pie apples include Northern Spy, Sierra Beauty, and Esopus Spitzenburg in the tart family, and Ginger Gold, Golden Delicious, Jazz, and Jonagold in the sweet.
Make-ahead tip: You can prepare the crust through step 1 and refrigerate for up to five days. You can also freeze the dough for up to three months. Defrost overnight in the refrigerator before using.
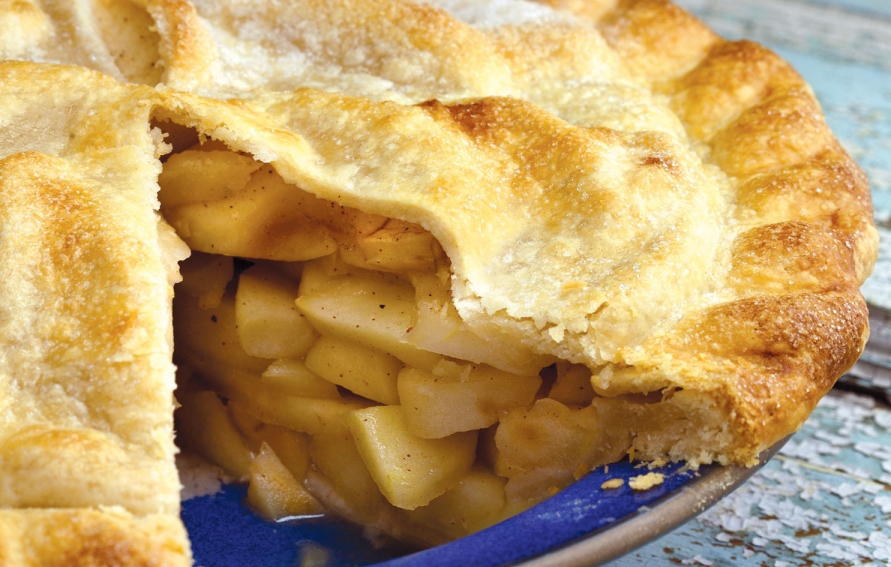
Recipe and photograph from The Apple Lover's Cookbook: Revised and Updated. Copyright 2020 by Amy Traverso. Photograph copyright 2011 by Squire Fox. Used with permission of the publisher, W.W. Norton & Company, Inc. All rights reserved.
About this recipe
Home chef Robbie Raffish shares what she learned by making this recipe:
This is the classic: top-and-bottom crust filled with cinnamon apples in a 9” standard pie tin. I had never made a pie from scratch before, and the directions are clear for a novice. The crust, my friend exclaimed, “is banging!” - light and flakey; a perfect complement to the Granny Smith and Golden Delicious apples. I followed Traverso’s directions for mixing by hand to create what she calls a “rough puff.” This one will be on my table Thanksgiving.
My crust needed 10 tablespoons of water and even then, after refrigerating, it was not a totally smooth dough. (I worried for naught.) I used a ruler to make sure I had the correct diameter, then cut overage to “patch” gaps. Rolling the dough on the pin was an awesome technique. Next time, I will bake the pie for 10 minutes longer as my apples were not as soft as I might have liked. But truly, no one complained!
One comment about the “rough puff” approach: My hands became a little tired between peeling and coring the apples and then mixing the dough, which is something to consider if you have carpel tunnel or arthritis. You may want to opt for a stand mixer (directions also included.)
Note: for Gluten and/or Dairy Free — Traverso believes a 1-to-1 gluten-free flour will work just as well. I plan to try that with a high-fat (likely avocado) plant butter or Crisco for those who won’t be able to eat the original this Thanksgiving.
Experience Level: Intermediate
Time Commitment: Active — 1 hour (plus chilling dough at least 50 minutes)
Ease of finding ingredients: 5 star
Cost: $
Recipe directions: 5 star
Taste: 5 star

